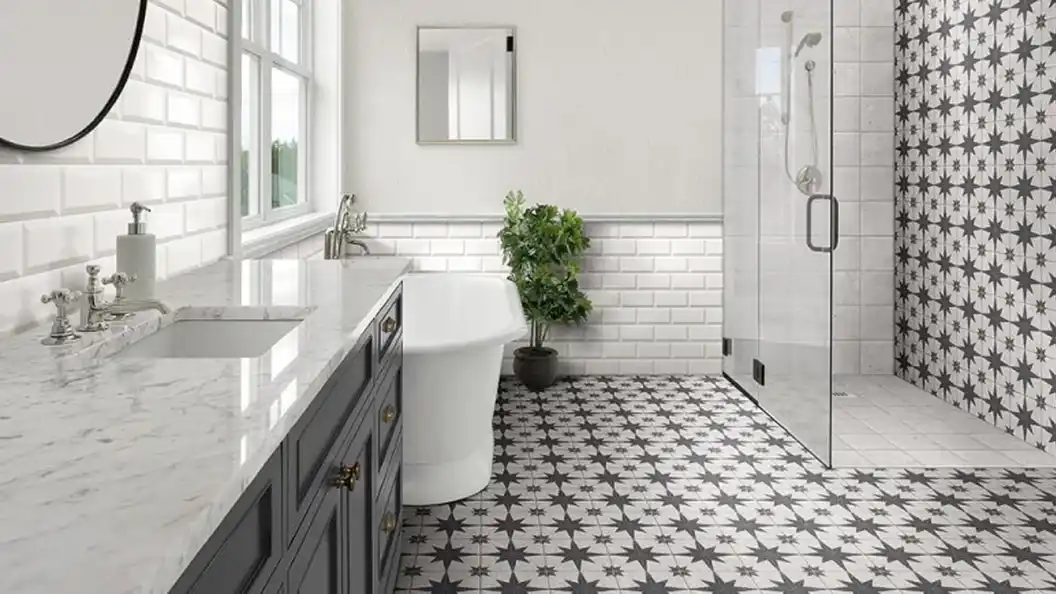
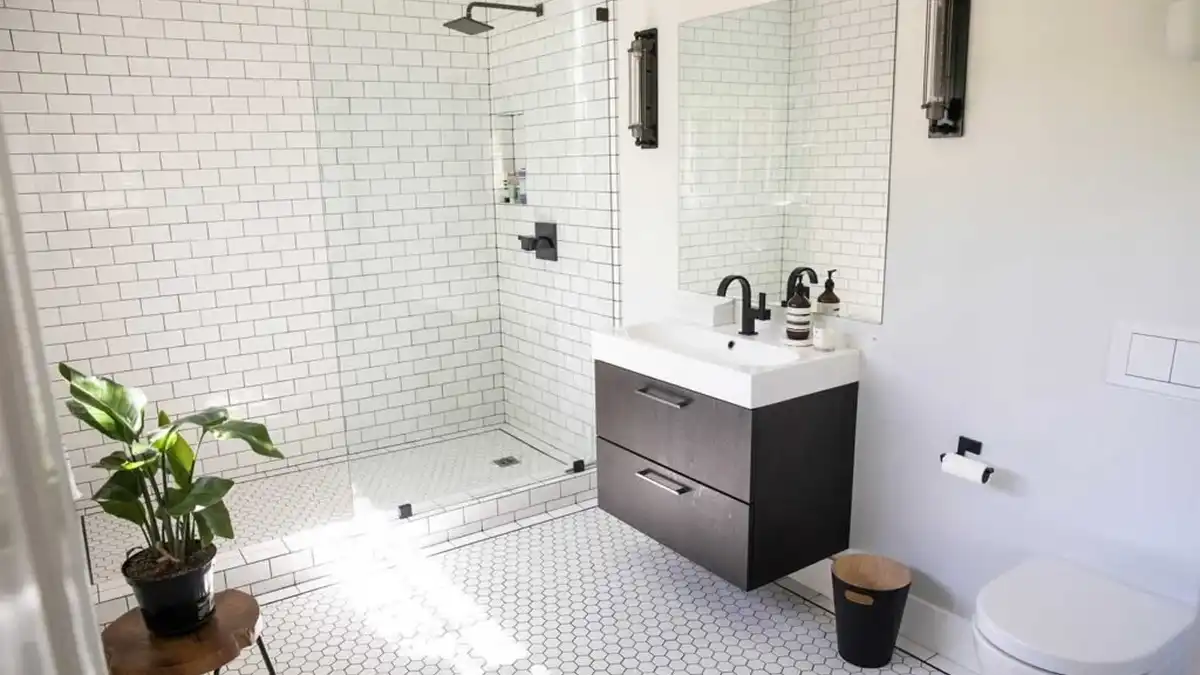
Tired of outdated or stained bathroom tiles? A tile renovation can transform your bathroom , turning a dated space into a modern sanctuary.
In Auckland, where homes face humid summers and damp winters—averaging 1200 mm of rainfall annually, per NIWA 2024 data—tiles often show wear faster, with mould or cracked grout becoming common issues.
Renovating your bathroom tiles not only refreshes the look but also boosts your home’s value, a key factor in Auckland’s $1.2 million average property market, per REINZ 2024 stats.
A well-tiled bathroom can add up to 3% to your resale price, making it a smart investment for homeowners in areas like Mount Eden or St Heliers.
Whether you’re a DIY enthusiast in Papatoetoe or a property manager in the CBD, this guide will walk you through the process step-by-step. While DIY can save costs, some tasks—like handling water damage or ensuring compliance with NZ standards—are best left to professionals.
My Homes Construct Ltd, Auckland’s trusted renovation experts, can ensure a flawless finish, whether you’re retiling or tackling a full remodel.
Assessing Your Current Tiles
Before diving into a tile renovation, assess your existing tiles to decide whether to renovate or replace them entirely. In Auckland, where humidity can exacerbate tile issues, a thorough check is essential.
- When to renovate vs replace:
- Renovate if tiles are structurally sound but stained, chipped, or have outdated grout—cleaning, regrouting, or replacing a few tiles can refresh the space, a common fix in North Shore bathrooms.
- Replace if there’s significant damage, like widespread cracking or loose tiles, often seen in older Mount Eden villas, where tiles may have lifted due to moisture, per local renovation trends.
- Consider your goals—renovating saves time and money, while replacing allows for a new design, ideal for modernizing CBD apartments, per 2024 Houzz NZ reports.
- Signs of damage, mold, poor grouting:
- Look for cracks, chips, or loose tiles, which indicate structural issues, especially in Titirangi homes where damp bush air accelerates wear, per NZ Building Code Clause E3 (Internal Moisture).
- Check for mould or mildew—black spots or a musty smell signal moisture problems, common in poorly ventilated Papatoetoe bathrooms, requiring immediate attention to prevent health risks.
- Inspect grout lines—crumbling or discoloured grout lets water seep through, risking further damage, a frequent issue in St Heliers’ coastal bathrooms exposed to salty air, per local builder insights.
Assessment Tip: Press on tiles to check for movement—if they shift or sound hollow, they may need replacing, as water could have damaged the adhesive underneath, a red flag in Auckland’s humid climate.
Understanding your tiles’ condition helps you plan the right approach, ensuring a successful renovation that suits your Auckland home’s needs.
Tools & Materials You’ll Need
Having the right tools and materials is crucial for a smooth tile renovation, whether you’re DIYing in Papatoetoe or prepping for a pro job in Remuera. Here’s what you’ll need:
- Tile cutter, chisel, grout remover:
- A manual tile cutter, like the Sigma 2G from Bunnings in Manukau ($100), ensures clean cuts for replacing damaged tiles, essential for precision in small Mount Eden bathrooms.
- Use a chisel and hammer, available at Mitre 10 in Henderson ($20–$30), to remove old tiles without damaging surrounding ones, a key step for partial renovations in North Shore homes.
- A grout remover tool, such as the Dremel Multi-Tool from Mitre 10 ($80), helps strip old grout efficiently, speeding up prep work in humid Titirangi bathrooms where grout often degrades.
- Waterproof adhesive:
- Choose a waterproof tile adhesive, like SikaCeram-290 from Mitre 10 ($40/20kg), designed for wet areas, ensuring tiles stay secure in Auckland’s 70% summer humidity, per NZ Building Code Clause E3.
- Ensure the adhesive is suitable for your tile type—porcelain needs a stronger bond than ceramic, a consideration for upscale St Heliers renovations, per manufacturer guidelines.
- Apply with a notched trowel, also at Mitre 10 ($15), for even coverage, preventing tiles from lifting over time, a common issue in poorly installed CBD apartment bathrooms.
- Safety gear:
- Wear safety glasses and gloves, available at Bunnings ($10–$20), to protect against tile shards and dust, a must during demolition, per WorkSafe NZ guidelines.
- Use a dust mask, like the 3M Respirator from Mitre 10 ($25), to avoid inhaling grout dust, especially in enclosed Papatoetoe bathrooms with limited ventilation.
- Knee pads, priced at $20 from Bunnings, make long tiling sessions more comfortable, ensuring you can focus on precision, a practical choice for DIYers in Parnell.
Tool Tip: Rent a wet tile saw from Hirepool in Albany ($50/day) for larger projects—it cuts tiles cleaner and faster, especially for intricate layouts in modern North Shore bathrooms.
With these tools and materials, you’ll be ready to tackle your tile renovation, ensuring a professional-quality result in your Auckland bathroom.
Step-by-Step Guide to Renovating Bathroom Tiles
Renovating bathroom tiles can be a manageable DIY project with the right approach, especially for Auckland homeowners looking to refresh their space. Follow these steps for a pro-level finish:
1. Clean and Prep the Area
A clean surface ensures better adhesion and a polished result, critical in Auckland’s humid bathrooms.
- Start by removing soap scum and grime—use a bathroom cleaner like Jif, available at Countdown in Newmarket ($5), to scrub tiles, ensuring no residue affects adhesive, per local cleaning tips.
- Dry the surface thoroughly with a towel or fan—moisture can weaken adhesive, a risk in Titirangi’s damp climate, per NZ Building Code Clause E3 (Internal Moisture).
- Clear the area of accessories, like towel racks or mirrors, and protect fixtures with painter’s tape, preventing damage during work, a practical step for Mount Eden renovations.
2. Remove Damaged or Old Tiles
Removing old tiles requires care to avoid damaging surrounding areas, a common task in North Shore bathrooms.
- Use a chisel and hammer to gently pry off damaged tiles—start at the edge and work inward, protecting nearby tiles, a technique suited for Papatoetoe’s older homes.
- For stubborn tiles, score grout lines with a grout remover tool first, reducing resistance, a time-saver in St Heliers’ coastal bathrooms where salt can harden grout, per local builder advice.
- Dispose of debris in a skip bin—Bin Hire in Auckland offers 2 cubic metre bins for $200, ensuring proper cleanup, per Auckland Council waste guidelines.
3. Prepare the Surface
A smooth, clean surface is key for new tiles to adhere properly, especially in Auckland’s wet conditions.
- Sand down the area with coarse sandpaper (80-grit, $10 at Bunnings) to remove old adhesive, creating a flat surface, essential for CBD apartments with uneven substrates.
- Clean off dust and debris with a damp cloth, ensuring no particles interfere with the adhesive, a critical step in humid Remuera bathrooms, per Clause E3 standards.
- Check for levelness using a spirit level ($15 at Mitre 10)—uneven surfaces can cause tiles to crack, a common issue in older Mount Eden villas, per local renovation feedback.
4. Apply New Tiles with Adhesive
Proper tile application ensures a lasting finish, tailored for Auckland’s diverse bathroom styles.
- Start tiling from the centre or a key corner, working outward for symmetry, a design trick for modern Parnell bathrooms, per 2024 Auckland Home Show trends.
- Apply waterproof adhesive with a notched trowel, spreading evenly, then press tiles firmly into place, using spacers ($5 at Bunnings) for even gaps, ensuring a professional look in North Shore homes.
- Cut tiles to fit edges with a tile cutter—measure twice to avoid mistakes, a must for intricate layouts in Titirangi bathrooms, per DIY best practices.
5. Grouting and Sealing
Grouting and sealing protect your tiles, ensuring they withstand Auckland’s humidity and wet seasons.
- Wait 24 hours for the adhesive to set, then apply grout—like SikaGrout from Mitre 10 ($30/5kg)—with a rubber float, filling gaps evenly, a key step for St Heliers bathrooms.
- Wipe excess grout with a damp sponge within 15 minutes, preventing haze, a common DIY error in Papatoetoe renovations, per local tiling guides.
- After 48 hours, apply a waterproof sealant, like SikaSeal ($25 at Mitre 10), to grout lines, protecting against moisture, a necessity in Auckland’s 1200 mm annual rainfall, per Clause E3.
Step Tip: Keep a bucket of water and sponge handy during grouting—it makes cleanup easier and ensures a neat finish, especially in smaller Mount Eden bathrooms.
Following these steps will give your bathroom tiles a professional-grade renovation, tailored for Auckland’s unique conditions and styles.
Pro Tips for a Smooth Tile Renovation
Even with a solid plan, tile renovations can have hiccups. These pro tips, inspired by Auckland’s renovation scene, will help you achieve a flawless result:
- Always measure twice:
- Double-check measurements before cutting tiles—errors can waste materials and disrupt your layout, a costly mistake in upscale Remuera bathrooms, per local builder insights.
- Use a laser measure, like the Bosch GLM 20 from Mitre 10 ($80), for precision, ensuring your tiles fit perfectly, especially in tricky corners of CBD apartments.
- Test tile layout before applying:
- Lay out tiles dry (without adhesive) to preview the pattern and spacing, adjusting for aesthetics, a design trick for modern Parnell bathrooms, per 2024 Houzz NZ trends.
- This helps avoid uneven cuts or awkward placements, ensuring a balanced look, a key consideration for North Shore bathrooms with large windows and visible layouts.
- Consider slip-resistant tiles for safety:
- Choose slip-resistant tiles, like textured porcelain from Tile Space in Newmarket ($60/sqm), for wet areas, reducing fall risks in Auckland’s humid bathrooms, per WorkSafe NZ guidelines.
- This is especially important for families in Papatoetoe or ageing-in-place designs in Titirangi, ensuring safety without sacrificing style, per local renovation feedback.
Pro Tip: Mix a small batch of grout first to test colour and consistency—some grouts darken when wet, impacting the final look, a detail often overlooked in St Heliers renovations.
These tips ensure your tile renovation goes smoothly, delivering a professional finish that enhances your Auckland bathroom’s look and safety.
When to Call a Professional in Auckland
While DIY tiling can be rewarding, some situations require expert help to ensure safety, compliance, and quality, especially in Auckland’s regulated and humid environment.
- Extensive water damage:
- If tiles are lifting due to water damage or mould is widespread, underlying issues like failed waterproofing need addressing, common in Titirangi’s damp settings, per NZ Building Code Clause E3.
- Professionals can assess and repair subfloor damage, ensuring a stable base, a task beyond most DIYers in Mount Eden’s older homes, per local builder expertise.
- My Homes Construct Ltd specializes in water damage repairs, ensuring your bathroom meets Clause E3 standards, preventing future issues, a key service for North Shore homeowners.
- Full bathroom remodel:
- A full remodel, including new layouts or fixtures, requires multiple trades—plumbers, electricians, and tilers—best managed by professionals, ideal for upscale Remuera renovations, per 2024 trends.
- Experts ensure compliance with Auckland Council regulations, like structural changes needing a building consent, per the Building Act 2004, a must in heritage zones like Parnell.
- My Homes Construct Ltd handles end-to-end remodels, delivering a seamless project with certified trades, ensuring quality and compliance, per their 10-year industry experience.
- Plumbing or structural concerns:
- Moving plumbing, like relocating a shower in Papatoetoe homes, requires a licensed plumber to meet Clause G1 (Personal Hygiene), avoiding leaks or low pressure, per NZS 3500.3 standards.
- Structural issues, like removing a wall in CBD apartments, need a building consent and engineer’s input, per Clause B1 (Structure), ensuring safety and legality, per Auckland Council rules.
- My Homes Construct Ltd coordinates all trades, ensuring plumbing and structural work aligns with your tiling, delivering a cohesive, high-quality finish, per client feedback.
Expert Tip: If you’re unsure about the scope, get a free consultation—My Homes Construct Ltd can assess your bathroom and advise on the best approach, saving you time and stress.
Calling in professionals for complex issues ensures your tile renovation is safe, compliant, and built to last in Auckland’s challenging conditions.
FAQs About Bathroom Tile Renovation
Can I tile over existing tiles in NZ?
Yes, if the existing tiles are secure and level, you can tile over them, saving time. However, check for water damage first, and ensure the new layer meets Clause E3 (Internal Moisture) for Auckland’s humid climate.
How long does a bathroom tile renovation take?
A DIY retiling project takes 3–5 days for a standard bathroom, including drying times. Professional jobs, like those by My Homes Construct Ltd, may take 1–2 weeks if combined with other renovations, per local timelines.
What tile type is best for wet areas in Auckland?
Porcelain tiles with slip-resistant finishes, like those from Tile Space ($60/sqm), are ideal for Auckland’s wet areas, resisting moisture and ensuring safety, per WorkSafe NZ guidelines and Clause E3 standards.
How much does a tile renovation cost in Auckland?
DIY costs range from $500–$1,500 for materials and tools, while professional retiling by My Homes Construct Ltd averages $3,000–$5,000, depending on size and complexity, per 2024 Builderscrack data.
Can I renovate tiles myself if I’m new to DIY?
Yes, for small repairs or regrouting, but extensive retiling or water damage repairs are best left to professionals, ensuring compliance with NZ regulations, especially in regulated areas like Parnell, per local advice.
Conclusion
Renovating bathroom tiles can breathe new life into your home, transforming a tired space into a stylish, functional retreat.
Whether you’re tackling a DIY project in Papatoetoe or refreshing a rental in the CBD, updated tiles enhance comfort, improve hygiene, and boost resale value in Auckland’s competitive $1.2 million property market.
This guide has walked you through assessing your tiles, gathering tools, and following a pro-level process, with tips to ensure a smooth renovation.
While DIY can work for smaller jobs, complex issues like water damage or plumbing require expert help to meet NZ standards and withstand Auckland’s humidity.
For a flawless finish, trust My Homes Construct Ltd — Auckland’s go-to renovation experts—to deliver a bathroom that’s both beautiful and built to last.
📞 Contact the Auckland Renovation Experts My Homes Construct Ltd
📞 Call : 022 315 8987
📧 Email : info@myhomesconstruct.co.nz From retiling to full makeovers—we’re Auckland’s trusted name in bathroom renovations. Ready to renovate your bathroom tiles? Contact us today for a free consultation and start your journey to a stunning new space!
Home Renovation Help Across Auckland
If this guide raised a question about your own home, the My Homes Construct Ltd team is here to help. We provide professional home renovation services right across Auckland — North Shore, West Auckland, Central Auckland, East Auckland and South Auckland — along with the surrounding suburbs.
Every enquiry starts with free, no-obligation advice and a written quote. We're a registered building company and back our work with a workmanship warranty as per your quotation, so you can move forward with confidence.
When to Call a Professional
Plenty of home renovation tasks are fine to tackle yourself, but it's worth knowing where the line is. If a job involves working at height, structural elements, water getting where it shouldn't, or anything you're not fully confident about, bringing in a professional is usually cheaper than fixing a DIY attempt that didn't hold up.
A good tradesperson also spots the things an untrained eye misses — the early warning signs that turn a small job today into a major repair next winter. If you're in any doubt, a free assessment costs nothing and gives you a clear, honest picture before you commit to anything.
A Quick Checklist for Auckland Homeowners
Whatever you decide to do next, a few simple principles will save you money and stress on any home renovation job in Auckland. Act early — Auckland's wet, humid climate turns small problems into expensive ones faster than most people expect. Get it in writing — a clear, itemised written quote protects you and makes comparing options straightforward. Check it's a registered building company — it matters for quality, consent and warranty cover. Ask about the warranty — reputable Auckland tradespeople stand behind their workmanship, not just the materials. Think long-term value, not just the cheapest price — the lowest quote is rarely the best value once durability is factored in.
Keep these in mind and you'll avoid the most common — and most costly — mistakes we see on Auckland properties.
Need Professional Help in Auckland?
My Homes Construct Ltd provides expert home renovation and full home-improvement services across all Auckland suburbs. Get a free, no-obligation quote today.