Gutters are a vital part of any Auckland home, channeling rainwater away from your roof, walls, and foundation to prevent costly damage.
But without sturdy gutter brackets, even the best gutter system can sag, leak, or fail—especially in Auckland’s wet and windy climate, where heavy rainfall and storms are a regular occurrence.
Loose or damaged brackets often signal support issues, leading to pooling water, overflowing gutters, or even structural damage to your fascia boards.
For homeowners in suburbs like Titirangi or Remuera, where sloped sections and large rooflines are common, ensuring your gutter brackets are secure is essential for protecting your property.
While installing gutter brackets can be a manageable DIY task for those comfortable with heights and tools, complex setups or high rooflines often call for professional expertise.
In this comprehensive guide, we’ll walk you through the step-by-step process to install gutter brackets, share tips for effective installation, and highlight when it’s best to call the experts at My Homes Construct Ltd, Auckland’s trusted gutter professionals.
Tools & Materials Needed
Before you start installing gutter brackets, gather the necessary tools and materials to ensure a smooth and safe process. Having everything on hand will save time and help you complete the job efficiently. Here’s what you’ll need:
- Gutter brackets: Match the type and material to your gutter system (e.g., hidden hangers for aluminium gutters). Purchase enough for your gutter length, spacing them every 40–60 cm.
- Drill and drill bits: A cordless drill with a 3–5 mm bit for pilot holes, suitable for wood or metal fascia boards.
- Ladder with stabilisers: A sturdy, extendable ladder rated for your weight, with stabilisers to prevent damage to the gutter or roofline. Essential for safely reaching the fascia, especially on two-storey homes in Remuera.
- Screws or fasteners: Stainless steel or galvanised screws (typically 25–40 mm long) to secure the brackets, ensuring they won’t rust in Auckland’s wet climate.
- Tape measure and pencil: For marking bracket positions accurately, ensuring even spacing and proper slope.
- Spirit level or laser level: To check the gutter’s slope (1:600 ratio, or 1 mm drop per 600 mm length) for effective drainage.
- Gutter sealant or silicone caulk: To seal joints or gaps after installation, preventing leaks. Use a low-VOC option for environmental sustainability.
- Safety gloves and goggles: Gloves protect your hands from sharp edges, while goggles shield your eyes from debris, such as wood shavings or rust flakes.
- Screwdriver or hex driver: For tightening screws, especially if your drill doesn’t have a compatible driver bit.
- Hacksaw (optional): If you need to trim the gutter to fit after removing a section for bracket installation.
- Cleaning cloth and wire brush: To clean the fascia and gutter, removing dirt, rust, or old sealant for a secure installation.
- Garden hose: To test water flow after installation, ensuring the gutter directs water properly to the downspout.
- Stud finder (optional): To locate rafter ends or studs behind the fascia for stronger bracket attachment, especially on older homes in Parnell.
Safety Tip: Ensure your ladder is placed on flat, stable ground, and never overreach—reposition it as needed to avoid falls, a common risk in Auckland’s often-wet conditions.
Having these tools and materials ready will set you up for a successful gutter bracket installation, ensuring your system is secure and ready to handle Auckland’s rainfall.
Step-by-Step Installation Guide
Installing gutter brackets is a straightforward process if you follow these steps carefully. This guide is tailored for Auckland homeowners, factoring in local conditions like frequent rain and the need for proper drainage slopes. Always prioritise safety when working at height.
1. Inspect and Mark Bracket Positions
Proper planning ensures your brackets are evenly spaced and aligned for effective drainage.
- Start by inspecting the existing gutter system for damage, sagging, or loose brackets. Note any sections that need replacing, such as rusted or bent brackets.
- Use a wire brush and cloth to clean the fascia board, removing dirt, rust, or old sealant to create a smooth surface for installation.
- Measure the length of the gutter section you’re working on with a tape measure, and mark bracket positions every 40–60 cm using a pencil. In high-wind areas like the North Shore, opt for closer spacing (40 cm) for extra support.
- Ensure the marks account for a slight slope (1:600 ratio, or 1 mm drop per 600 mm) toward the downspout for proper drainage, as required by NZ Building Code Clause E2.
- Use a spirit level or laser level to confirm the slope, marking a straight line along the fascia to guide bracket placement.
- If installing near a downspout, position the first bracket about 10–15 cm from the downspout to avoid obstructing water flow.
Accuracy Tip: Double-check your measurements and slope with a spirit level to ensure water flows smoothly, preventing pooling that can lead to overflows during Auckland’s heavy rains.
2. Drill Pilot Holes into Fascia or Rafter Ends
Drilling pilot holes ensures secure attachment without splitting the fascia or damaging the brackets.
- Wear safety gloves and goggles to protect yourself from debris, such as wood shavings or rust flakes.
- Use a stud finder to locate rafter ends or studs behind the fascia for stronger attachment, especially on older homes in Grey Lynn where fascia boards may be weaker.
- Align your drill with the marked positions, and drill a 3–5 mm pilot hole into the fascia or rafter end, depending on the screw size. Drill straight to ensure the bracket sits flush.
- If the fascia is damaged or rotting (common in Auckland’s humid climate), stop and address the issue first—rotten fascia won’t hold brackets securely, and you may need professional help.
- Clear away any debris from the holes with a cloth to ensure a clean fit for the screws.
- For hidden hangers, you’ll drill through the bracket itself into the fascia after positioning it in the next step.
Caution: Avoid drilling too deeply, as this can weaken the fascia or damage underlying structures like soffits, a concern in heritage homes in Parnell.
3. Align Brackets to Maintain Slope
Proper alignment ensures the gutter maintains its slope and fits securely against the fascia.
- Position the first bracket at the marked spot, aligning it with the sloped line you marked earlier. For fascia brackets, the bracket’s top should sit just below the fascia edge to support the gutter properly.
- For hidden hangers, clip the hanger inside the gutter first, then align it with the fascia mark, ensuring the gutter’s slope is maintained.
- Use a spirit level to double-check the bracket’s alignment with the sloped line, adjusting as needed to ensure water will flow toward the downspout.
- If installing multiple brackets, work from one end of the gutter to the other, ensuring each bracket follows the same slope for consistent drainage.
- Temporarily hold the bracket in place (or have a helper assist) while you move to the next step to secure it.
Alignment Tip: Place a small piece of tape on the fascia to mark the slope line, making it easier to align each bracket accurately as you work along the gutter length.
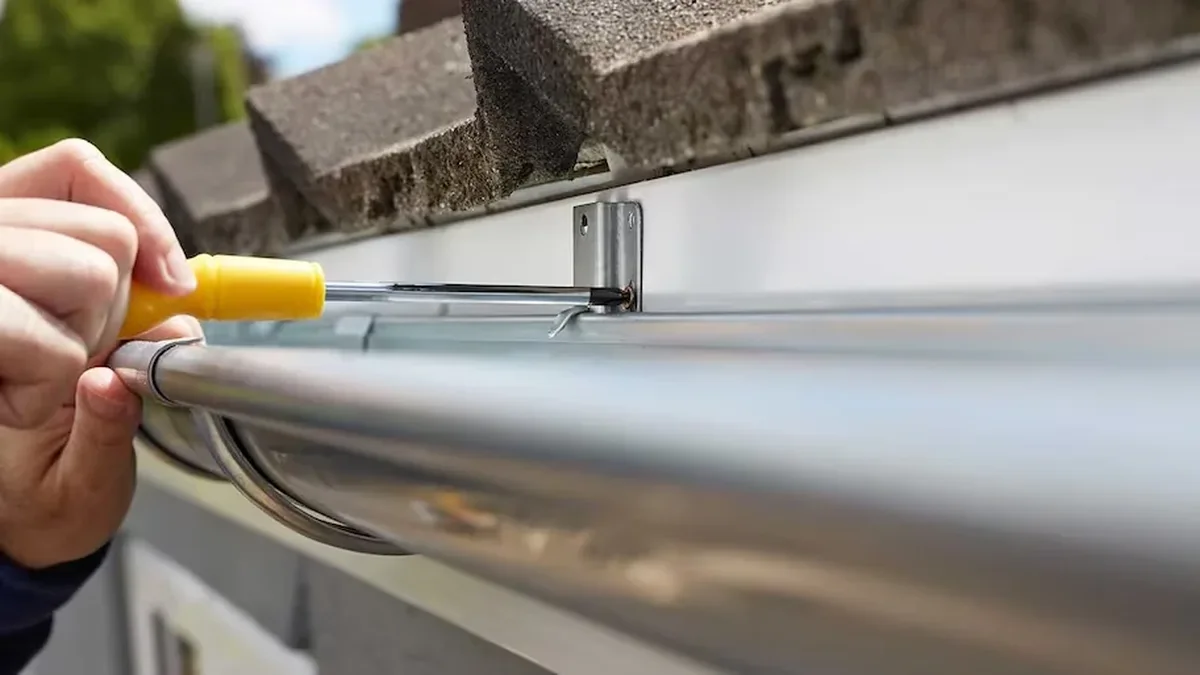
4. Secure Each Bracket with Appropriate Fasteners
Securely fastening the brackets ensures the gutter system can withstand Auckland’s weather conditions.
- Using your drill or screwdriver, drive a galvanised or stainless steel screw through the bracket’s pre-drilled hole (or directly through the bracket for hidden hangers) into the pilot hole in the fascia.
- Tighten the screw until the bracket is secure, but avoid overtightening, which can strip the hole or damage the fascia, especially on older timber fascia boards common in Mount Eden.
- For spike-and-ferrule brackets, insert the ferrule inside the gutter, align the spike through the gutter’s front lip, and drive it into the fascia with a hammer until secure. Ensure the spike doesn’t bend the gutter.
- Repeat the process for each bracket, checking alignment and slope with a spirit level as you go to maintain consistency.
- If a bracket feels loose (e.g., due to a weak fascia), use a longer screw or secure it into a rafter end for added strength, or consider replacing the fascia board.
- Once all brackets are installed, give each one a gentle tug to ensure it’s firmly attached and can support the gutter’s weight.
Strength Tip: Use two screws per bracket for added stability in high-wind areas like the Waitakere Ranges, where gusts can put extra stress on gutter systems.
5. Refit the Gutter Section
With the brackets in place, it’s time to reattach the gutter to ensure a secure fit.
- If you removed the gutter section to install the brackets, lift it back into place, sliding it into the brackets or clipping it onto hidden hangers as needed.
- For fascia brackets, ensure the gutter sits snugly in the bracket’s cradle, with the back edge pressed against the fascia for a tight fit.
- For hidden hangers, confirm the gutter is clipped securely into each hanger, with no gaps that could allow water to leak behind the gutter.
- Check the gutter’s alignment with a spirit level, ensuring the slope toward the downspout is maintained (1:600 ratio) for proper drainage.
- Apply a bead of gutter sealant or silicone caulk to any joints or seams where the gutter sections connect, using a caulk gun for precision. Smooth the sealant with a gloved finger to ensure a watertight seal.
- Let the sealant cure for 24 hours—or longer in Auckland’s humid weather—to ensure it sets properly before testing the system.
Sealing Tip: Use a sealant that’s compatible with your gutter material (e.g., silicone for aluminium gutters) to prevent corrosion, a concern in Auckland’s salty coastal air.
6. Test Water Flow and Structural Hold
Testing the gutter system after installation confirms the brackets are secure and the system functions as intended.
- Run water through the gutter using a garden hose, starting at the highest point and letting it flow toward the downspout.
- Observe the gutter for leaks, pooling, or overflow, which could indicate an incorrect slope or loose brackets. Adjust the brackets or slope as needed to correct any issues.
- Check the downspout’s outlet to ensure water flows freely into the drain or away from your home’s foundation, preventing erosion or foundation damage, a key concern in Auckland’s clay soils.
- Gently shake the gutter to test the brackets’ structural hold—there should be minimal movement, indicating a secure installation.
- Inspect the area around your home’s foundation, walls, and landscaping to ensure no water is spilling over, which could lead to damage or pest issues, such as mosquito breeding in pooled water.
- If issues persist, such as leaks or sagging, double-check the bracket spacing and slope, or consider calling a professional to address underlying problems like fascia damage.
Testing Tip: Test the system during a light rain if possible, as this will give you a real-world sense of how the gutter handles Auckland’s typical weather conditions.
By following these steps, you’ll ensure your gutter brackets are installed correctly, providing reliable support for your gutter system and protecting your Auckland home from water damage.
Tips for Effective Installation
To ensure your gutter bracket installation is successful and long-lasting, keep these practical tips in mind, tailored for Auckland’s unique conditions:
- Bracket spacing (every 40–60 cm):
- Space brackets closer together (40 cm) in high-wind areas like the North Shore or Waitakere Ranges to provide extra support against gusts, which can put stress on the gutter system.
- For calmer areas like Papatoetoe, spacing at 60 cm is sufficient for most gutter systems, as long as the brackets are securely fastened.
- Ensure even spacing to distribute the gutter’s weight evenly, preventing sagging or stress points that could lead to failure.
- Maintain proper drainage slope:
- Aim for a 1:600 slope (1 mm drop per 600 mm length) to ensure water flows smoothly toward the downspout, as required by NZ Building Code Clause E2.
- Use a spirit level or laser level to check the slope at multiple points during installation, adjusting brackets as needed to avoid pooling or overflow.
- If the slope is too steep, water may flow too quickly and overshoot the downspout; if too shallow, it can pool and cause leaks, a common issue during Auckland’s heavy rains.
- Avoid overtightening to protect fascia boards:
- Tighten screws until the bracket is secure, but stop before applying excessive force, which can strip the pilot hole or crack the fascia, especially on older timber fascia boards in Mount Eden.
- If you encounter resistance while tightening, check for obstructions or use a slightly larger drill bit to widen the pilot hole, ensuring a smooth fit without damaging the fascia.
- For weaker fascia boards, consider using longer screws to reach into the rafter ends for added strength, or replace the fascia if it’s damaged.
- Use corrosion-resistant fasteners:
- Opt for stainless steel or galvanised screws to prevent rust, as Auckland’s humid and salty air can accelerate corrosion, especially in coastal areas like St Heliers.
- Apply a rust-proofing spray to metal brackets after installation for extra protection, extending their lifespan in Auckland’s challenging climate.
- Work in dry conditions:
- Avoid installing brackets during wet or windy weather, as Auckland’s rain can make ladders slippery and increase the risk of falls. Schedule the project for a dry day, ideally in summer or early autumn.
- If rain starts during installation, stop and wait for better conditions—wet fascia boards can swell, making it harder to secure brackets properly.
- Check for fascia damage before starting:
- Inspect the fascia for rot, cracks, or water damage, which can weaken its ability to hold brackets. In Auckland’s humid climate, fascia damage is common, especially on older homes in Ponsonby.
- If the fascia is compromised, replace it before installing brackets, or call a professional to ensure the gutter system is securely supported.
- Use a helper for longer gutter sections:
- For longer gutter runs (over 5 metres), enlist a helper to hold the gutter in place while you secure the brackets, ensuring proper alignment and slope.
- A helper can also assist with ladder safety, holding the base steady while you work at height, reducing the risk of accidents.
Safety Reminder: Always follow ladder safety guidelines—ensure the ladder extends at least 1 metre above the working height, and never work alone on a two-storey home, a common setup in Remuera.
These tips will help you install gutter brackets effectively, ensuring your gutter system is secure, functional, and ready to handle Auckland’s weather.
When to Call the Professionals
While installing gutter brackets can be a DIY project for confident homeowners, certain situations require professional expertise to ensure safety, compliance, and durability. Here’s when to call the experts at My Homes Construct Ltd:
- Damaged or rotting fascia:
- If the fascia board is rotten, cracked, or water-damaged—a common issue in Auckland’s humid climate—it won’t provide a secure base for brackets. Professionals can replace the fascia and install brackets properly, ensuring long-term stability.
- Rotting fascia can also indicate underlying issues, such as poor roof drainage or leaks, which professionals can address to prevent further damage, especially in older homes in Parnell.
- Two-storey or steep rooflines:
- Working on a two-storey home or a steep roofline, common in suburbs like Remuera or Titirangi, increases the risk of falls and requires specialised equipment like scaffolding or harnesses.
- Professionals have the training and gear to work safely at height, ensuring the brackets are installed correctly without putting you or your property at risk.
- Ongoing leaks or gutter misalignment:
- If your gutters continue to leak, overflow, or sag after installing new brackets, there may be deeper issues, such as incorrect slope, blocked downspouts, or structural damage to the roofline.
- Professionals can diagnose and fix these problems, ensuring your gutter system meets NZ Building Code Clause E2 requirements for effective rainwater management.
- Complex gutter systems:
- Homes with intricate rooflines, multiple downspouts, or custom gutter designs (e.g., heritage homes in Grey Lynn) require precise bracket placement and slope adjustments, which can be challenging for DIYers.
- Professionals ensure the system is installed correctly, preventing issues like pooling or overflow that can lead to foundation damage in Auckland’s clay soils.
- Time constraints or lack of experience:
- If you’re short on time or lack experience with tools and working at height, a professional installation can save you stress and ensure the job is done right the first time.
- My Homes Construct Ltd can complete most bracket installations in a single day, compared to several days for a DIY project, allowing you to protect your home quickly.
- Ensuring compliance with NZ regulations:
- Gutter systems must comply with NZ Building Code Clause E2 for external moisture management, which includes proper slope, secure attachment, and effective drainage.
- Professionals ensure your installation meets these standards, avoiding potential fines or rework if the system fails a council inspection, a concern for property managers handling rentals.
Safety Note: Falls from ladders are a leading cause of DIY injuries in New Zealand. If you’re not comfortable working at height or the job feels too complex, don’t take the risk—call a professional.
Hiring My Homes Construct Ltd ensures your gutter brackets are installed safely, compliantly, and built to withstand Auckland’s challenging weather, giving you peace of mind and a reliable gutter system.
Expert Gutter Help in Auckland
Don’t let loose or damaged gutter brackets put your Auckland home at risk of water damage.
My Homes Construct Ltd is your local expert for gutter repairs and installations, ensuring your system is secure, functional, and ready for Auckland’s wet seasons, whether you’re in a villa in Ponsonby or a modern home in the North Shore.
📞 Call the My Homes Construct Ltd: 022 315 8987
📧 Email: info@myhomesconstruct.co.nz
🌐 Website: https://myhomesconstruct.co.nz
From minor repairs to full gutter replacements—we’re Auckland’s gutter pros! Contact us today for a free consultation and let us keep your home protected.
FAQs About Installing Gutter Brackets
What’s the ideal spacing for gutter brackets in NZ?
In New Zealand, gutter brackets should be spaced every 40–60 cm, depending on wind conditions. In high-wind areas like the North Shore, space them at 40 cm for extra support; in calmer areas like Papatoetoe, 60 cm is sufficient.
Can old gutter brackets be reused?
Old brackets can be reused if they’re free of rust, cracks, or damage, and still fit your gutter system. However, in Auckland’s salty air, replacing old brackets with new, corrosion-resistant ones (like galvanised steel) is often a better long-term solution.
What’s the safest way to install gutter brackets on a two-storey home?
Use a sturdy ladder with stabilisers, extending at least 1 metre above the working height, and have a helper hold the base. For two-storey homes in Remuera, it’s safer to hire professionals with scaffolding or harnesses to avoid falls.
How do I know if my fascia board needs replacing?
Check for rot, cracks, or water damage—soft, discoloured, or crumbling wood indicates the fascia needs replacing. In Auckland’s humid climate, this is common, and a professional can replace it before installing brackets.
Can I install gutter brackets in the rain?
It’s not recommended—rain makes ladders slippery and fascia boards wet, increasing the risk of falls and reducing screw grip. Schedule the installation for a dry day, ideally in summer, to ensure safety and a secure fit.

Conclusion
Installing gutter brackets is a practical DIY project that can keep your Auckland home’s gutter system secure and functional, protecting your property from water damage during the city’s frequent rains.
By following this step-by-step guide—inspecting and marking positions, drilling pilot holes, aligning and securing brackets, refitting the gutter, and testing the system—you can ensure your gutters are supported properly and ready to handle whatever weather comes your way.
Tips like maintaining proper spacing, ensuring a drainage slope, and avoiding overtightening will help you achieve a professional-quality installation. However, if you’re dealing with damaged fascia, a two-storey home, or ongoing gutter issues, don’t risk leaks, falls, or costly damage by going it alone.
My Homes Construct Ltd offers expert gutter services for Auckland homeowners, delivering reliable, weather-ready solutions that keep your gutters performing perfectly. Contact us at 022 315 8987, email info@myhomesconstruct.co.nz, or visit our website to schedule a consultation .
Let us ensure your gutter system is built to last!
Frequently Asked Questions
What Are Gutter Brackets?
Gutter brackets, also known as gutter hangers, are essential components that secure your gutter system to your home, ensuring it stays in place and functions effectively. In Auckland, where homes must withstand frequent rain and strong winds, understanding the role of gutter brackets and choosing the right type is key to maintaining a reliable drainage system. Here’s a closer look at their purpose, types, and suitable materials for New Zealand conditions: Purpose and function in gutter systems : Gutter brackets attach the gutter to the fascia board or rafter ends, providing structural support
Gutter Help Across Auckland
If this guide raised a question about your own home, the My Homes Construct Ltd team is here to help. We provide professional gutter cleaning, repair and replacement services right across Auckland — North Shore, West Auckland, Central Auckland, East Auckland and South Auckland — along with the surrounding suburbs.
Every enquiry starts with free, no-obligation advice and a written quote. We're a registered building company and back our work with a workmanship warranty as per your quotation, so you can move forward with confidence.
When to Call a Professional
Plenty of gutter cleaning, repair and replacement tasks are fine to tackle yourself, but it's worth knowing where the line is. If a job involves working at height, structural elements, water getting where it shouldn't, or anything you're not fully confident about, bringing in a professional is usually cheaper than fixing a DIY attempt that didn't hold up.
A good tradesperson also spots the things an untrained eye misses — the early warning signs that turn a small job today into a major repair next winter. If you're in any doubt, a free assessment costs nothing and gives you a clear, honest picture before you commit to anything.
A Quick Checklist for Auckland Homeowners
Whatever you decide to do next, a few simple principles will save you money and stress on any gutter cleaning, repair and replacement job in Auckland. Act early — Auckland's wet, humid climate turns small problems into expensive ones faster than most people expect. Get it in writing — a clear, itemised written quote protects you and makes comparing options straightforward. Check it's a registered building company — it matters for quality, consent and warranty cover. Ask about the warranty — reputable Auckland tradespeople stand behind their workmanship, not just the materials. Think long-term value, not just the cheapest price — the lowest quote is rarely the best value once durability is factored in.
Keep these in mind and you'll avoid the most common — and most costly — mistakes we see on Auckland properties.
Need Professional Help in Auckland?
My Homes Construct Ltd provides expert gutter and full home-improvement services across all Auckland suburbs. Get a free, no-obligation quote today.